Headlights Go Out
#1
 01-28-2010, 10:56 AM


In the last month the headlights on our 04 Marquis have gone out while driving. The dashlights, turnsignals, and emergency lights continue to work. I had the switch replaced....it happened again. While they were out,I turned the switch to other positions with no change. The lights came on again after a minute or so. A few seconds later they went out again but came on again a few seconds later. One mechanic looked into replacing a module($500),but was told by his sources that they had only replaced the modules only on police cars which have a greater lighting load. Any ideas...that problem makes the car worthless and hardly usable. Thanks, Lloyd
#2
01-29-2010, 11:00 AM

the circuit breaker in the under the hood fuse box needs to be replaced. (or is it in the under dash fuse box?) *goes and checks the manual for the 04 MGM at www.motorcraftservice.com *
yeah... under the hood. looks like #11
yeah... under the hood. looks like #11
#3
02-01-2010, 09:29 PM

The LCM (lighting control module) is known to be problematic. It seems one, or two relays are underdesigned.
Someone on eBay has a rebuilding service for this and they upgrade the relay's in amp specs. I have heard good things about this service.
I would perhaps buy a junk yard LCM and ship it off for a rebuild, then have your rebuilt so you will have a spare.
Let us know how you make out. Take care, Bill
Someone on eBay has a rebuilding service for this and they upgrade the relay's in amp specs. I have heard good things about this service.
I would perhaps buy a junk yard LCM and ship it off for a rebuild, then have your rebuilt so you will have a spare.
Let us know how you make out. Take care, Bill
#4
02-03-2010, 02:21 PM

This is a very common problem on panther platform cars with an LCM.
The problem is the whimpy relays built into the LCM, they can sporaticlly fail over time.
I had this problem on my 2000, the fix is quite simple and cheap.
The following writeup was authored by dRock96marquis from Crownvic.net.
The problem is the whimpy relays built into the LCM, they can sporaticlly fail over time.
I had this problem on my 2000, the fix is quite simple and cheap.
The following writeup was authored by dRock96marquis from Crownvic.net.
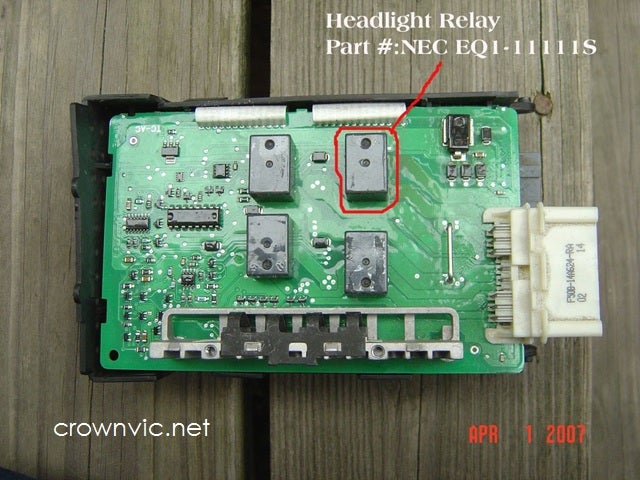
The following describes replacement of the internal headlamp relay of 2003-2004 Crown Victoria /Grand Marquis / Marauder Lighting Control Modules (LCM) in favor of an external relay and base. The process would be similar for comparable year Lincoln Town Cars however their LCM is unique from the CV/GMQ/MM.
Headlamp relay failure is VERY common on 2003 models causing erratic headlamp operation or no headlamps at all. This fix explains how to remove the stock relay and solder in extension leads to use an externally mounted relay and base using a common and easy to find BOSCH iso-style 30/40amp automotive relay. Making simple replacement should the relay fail in the future, and saving you from $400 for a new LCM from the dealer!
You can also use this same procedure if you simply want to replace the PCB mounted relay with the same part.
If you are not familiar with soldering on a printed circuit board you should let someone with experience solder the leads to the board for you.
The following article was authored by vicvega, and was originally posted in This Thread
===============================================
LCM WOES gone for now. External Relay fix
I DON�T RECOMMEND DOING THIS UNLESS YOU KNOW WHAT YOURE DOING.
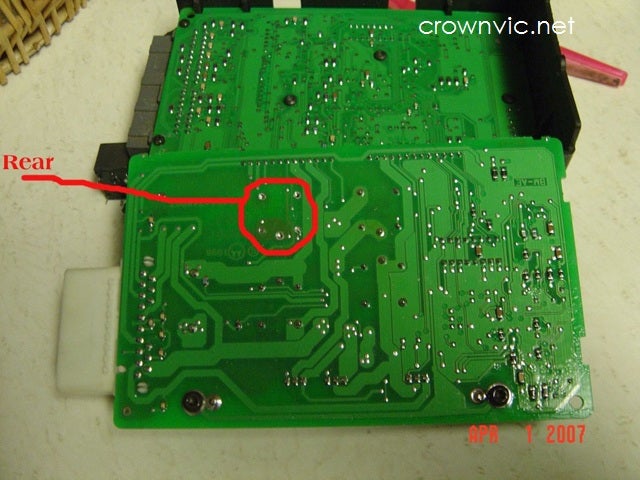
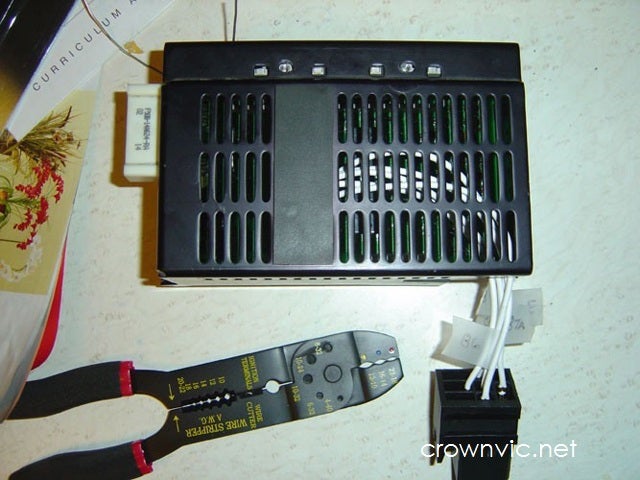
I located the headlight relay. Unsoldered it carefully from the board. You have to be because of close connections and the board can be easily damaged.
I had to go online to get the schematic for the old relay as it�s not printed on it due to its size. If you ask me the relay looks and feels cheap to begin with. I got the info here: http://www.worldproducts.com/pdfs/eq1.pdf
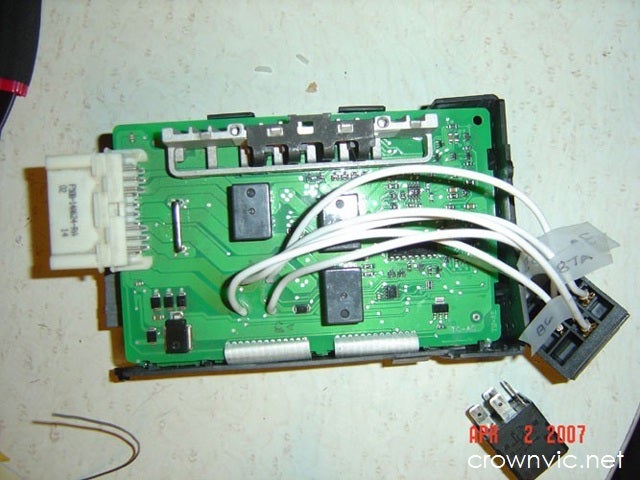
I used masking tape to label each wire to make sure I didn�t make an error and fry the whole unit altogether. Got a few connectors and soldered them to the wire. I used 22 (12awg recommended for load wires (30/87))-d gauge solid wire which is good enough. It didn�t get hot so far and everything is working great so far. This is a temporary fix till I get a new LCM. I don�t suggest doing this unless you really know what you�re doing. I had my best friend who�s an electrician for the city help me out.
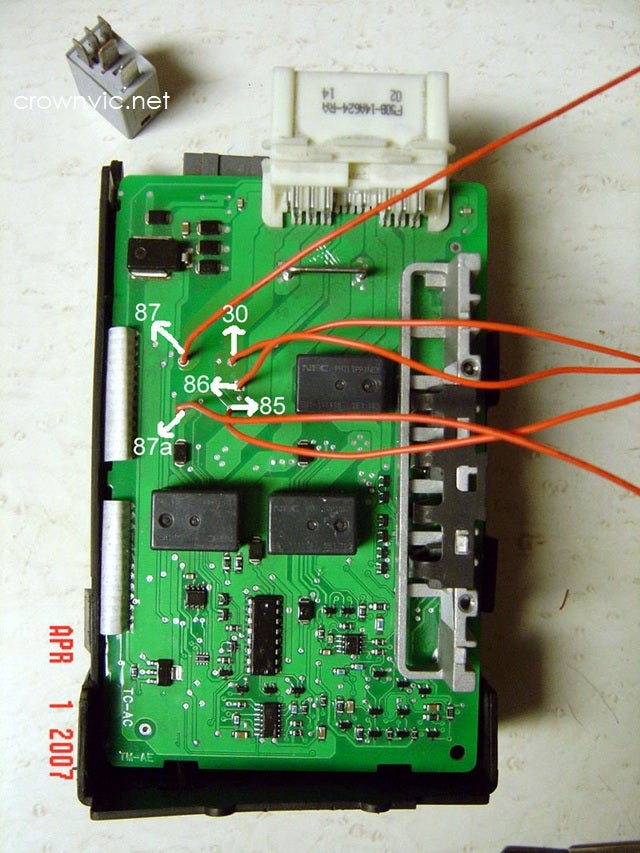
****Note: In the above picture the 30 and 86 pin labels are reversed. However, even if you do wire it like this it will operate correctly as they are both on the same circuit trace. The correct #30 position has the larger opening for thicker AWG wire, however -d
----Courtesy vicvega
Edited by dRock96Marquis (Sat Feb 28 2009 04:37 PM)
Edit Reason: Image update
Headlamp relay failure is VERY common on 2003 models causing erratic headlamp operation or no headlamps at all. This fix explains how to remove the stock relay and solder in extension leads to use an externally mounted relay and base using a common and easy to find BOSCH iso-style 30/40amp automotive relay. Making simple replacement should the relay fail in the future, and saving you from $400 for a new LCM from the dealer!
You can also use this same procedure if you simply want to replace the PCB mounted relay with the same part.
If you are not familiar with soldering on a printed circuit board you should let someone with experience solder the leads to the board for you.
The following article was authored by vicvega, and was originally posted in This Thread
===============================================
LCM WOES gone for now. External Relay fix
I DON�T RECOMMEND DOING THIS UNLESS YOU KNOW WHAT YOURE DOING.
I located the headlight relay. Unsoldered it carefully from the board. You have to be because of close connections and the board can be easily damaged.
I had to go online to get the schematic for the old relay as it�s not printed on it due to its size. If you ask me the relay looks and feels cheap to begin with. I got the info here: http://www.worldproducts.com/pdfs/eq1.pdf
I used masking tape to label each wire to make sure I didn�t make an error and fry the whole unit altogether. Got a few connectors and soldered them to the wire. I used 22 (12awg recommended for load wires (30/87))-d gauge solid wire which is good enough. It didn�t get hot so far and everything is working great so far. This is a temporary fix till I get a new LCM. I don�t suggest doing this unless you really know what you�re doing. I had my best friend who�s an electrician for the city help me out.
****Note: In the above picture the 30 and 86 pin labels are reversed. However, even if you do wire it like this it will operate correctly as they are both on the same circuit trace. The correct #30 position has the larger opening for thicker AWG wire, however -d
----Courtesy vicvega
Edited by dRock96Marquis (Sat Feb 28 2009 04:37 PM)
Edit Reason: Image update
#5
02-03-2010, 02:28 PM
However the fix I chose was much simpler and just as effective. But if your headlight relays are completlly shot, this wont work.
The following tech article explains how to make your own headlamp wiring relay upgrade kit.
The factory wiring, because of its length and smaller gauge, causes a voltage drop before it reaches the bulbs. This reduces light output considerably. By upgraded to thicker gauge wiring with relays, you can provide your headlamps full available power for maximum output
It directly applies to 1992-1997 CV/GM, however it can be used as a guide for virtually any vehicle (substitute the bulb connector types for your vehicle (*98-05 panther = 9007 (exc 03+ TC))
For those feeling less ambitious, Painless (among others) makes a direct fit relay upgrade kit for various bulb types.
The following article was authored by Dextrovic, and was excerpted from this thread
===============================================
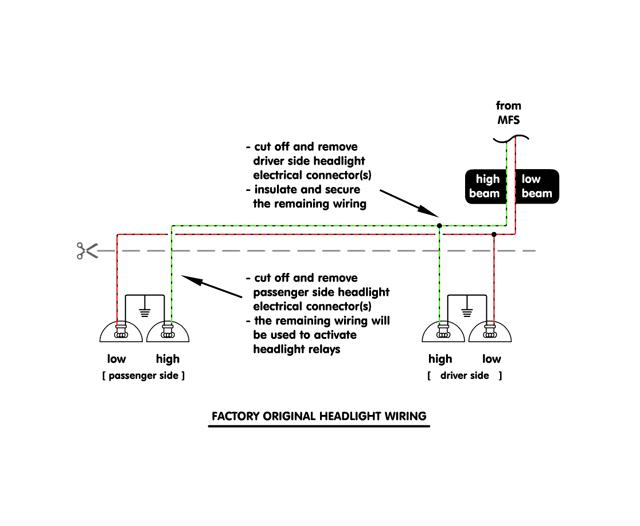
***ALL*** years will benefit from a headlight circuit rewire regardless of headlight switch type. The factory headlight wiring is a pitiful joke: too small wire gauge and too long at that.
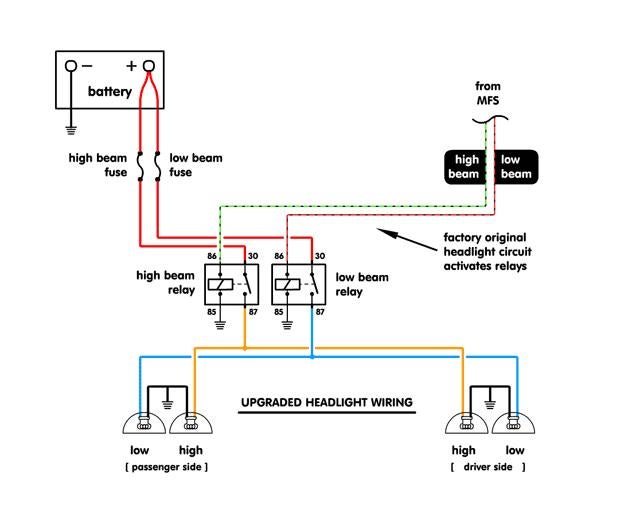
For fuses, I used 2x 20A ATO blade-style fuses. This ensures that both low- and high-beam circuits are 100% completely independent for fault tolerance. With stock 51W 9006s low-beam and 60W 9005s high-beam bulbs this is ample protection.
Be sure to use 30A Bosch-style power relays, preferably with matching harnesses and 12 or 10 AWG wiring for best effect. Keep all wires as short as possible. Use heatshrink tubing for wire insulation and split loom (convoluted tubing) to protect said wires.
Use Packard Electric (General Motors) Metri-Pak 280 connectors to match the wire gauge that will be used when replacing the headlight socket metal terminals. If that isn't possible, a less preferable method is to reuse the old sockets, cut the wiring down to form a pigtail and solder the new wires on.
Personal note: I exclusively solder each and every connection and use black heat shrink tubing, black split loom, and black nylon zip ties in all my electrical work...electrical performance is nothing without style
Schematics:
The procedure:
Be aware that there are two (2) air bag crash sensors bolted to the upper radiator support behind the header panel near each headlight respectively, so exercise caution at all times.
Optional: replace headlight bulbs with new equivalents (filament luminous output does degrade with time).
----Article submission courtesy Dextrovic
The factory wiring, because of its length and smaller gauge, causes a voltage drop before it reaches the bulbs. This reduces light output considerably. By upgraded to thicker gauge wiring with relays, you can provide your headlamps full available power for maximum output
It directly applies to 1992-1997 CV/GM, however it can be used as a guide for virtually any vehicle (substitute the bulb connector types for your vehicle (*98-05 panther = 9007 (exc 03+ TC))
For those feeling less ambitious, Painless (among others) makes a direct fit relay upgrade kit for various bulb types.
The following article was authored by Dextrovic, and was excerpted from this thread
===============================================
***ALL*** years will benefit from a headlight circuit rewire regardless of headlight switch type. The factory headlight wiring is a pitiful joke: too small wire gauge and too long at that.
For fuses, I used 2x 20A ATO blade-style fuses. This ensures that both low- and high-beam circuits are 100% completely independent for fault tolerance. With stock 51W 9006s low-beam and 60W 9005s high-beam bulbs this is ample protection.
Be sure to use 30A Bosch-style power relays, preferably with matching harnesses and 12 or 10 AWG wiring for best effect. Keep all wires as short as possible. Use heatshrink tubing for wire insulation and split loom (convoluted tubing) to protect said wires.
Use Packard Electric (General Motors) Metri-Pak 280 connectors to match the wire gauge that will be used when replacing the headlight socket metal terminals. If that isn't possible, a less preferable method is to reuse the old sockets, cut the wiring down to form a pigtail and solder the new wires on.
Personal note: I exclusively solder each and every connection and use black heat shrink tubing, black split loom, and black nylon zip ties in all my electrical work...electrical performance is nothing without style
Schematics:
The procedure:
Be aware that there are two (2) air bag crash sensors bolted to the upper radiator support behind the header panel near each headlight respectively, so exercise caution at all times.
- Disconnect the battery.
- Choose a dominant side to work with. The passenger side would be preferable as that's the side where the battery resides naturally.
- Find a wholesome locale for both relays and use it. I chose the bracket that both the ambient and outside temperature senders call home on the pass. side header bracket, as I have the digi-dash. There isn’t much clearance to allow for drilling anyway (do mind the airbag crash sensors in the general vicinity). Folks with the analog cluster and without ATC/EATC won't have this bracket or the sensors--so improvise
 ). Be extra mindful not to impede airflow to said temperature senders if you have them. Also, newer Panthers will only have one temperature sender.
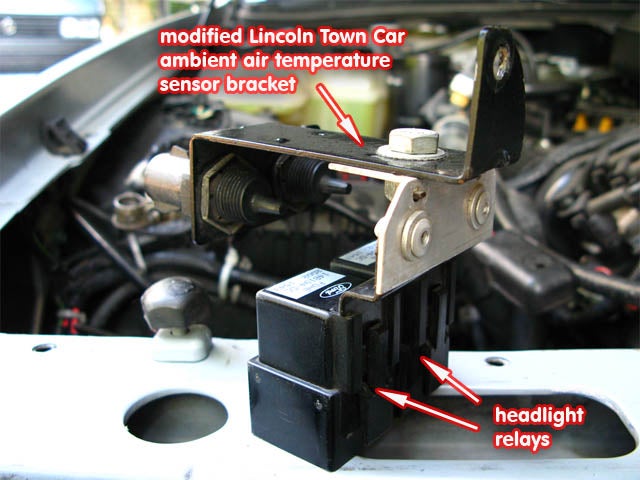
Another View
Header panel support with bracket removed (will vary between body styles)
Bracket installed (will vary between body styles) - Cut off ALL existing headlight connectors (saving them) thusly: The driver's side connectors will not be used at all so cut them short and cap them off/tie them to the existing harness. The passenger side wires can be left long as they will be used for activating the relays.
- Using the headlight wiring on the passenger side, do the following:
- Designate one relay to serve the low-beam circuit and the other the high-beam circuit.
- Each relay will have the following terminals: 85 (coil ground), 86 (coil +12V), 30 (hot power input), and 87 (normally open power output). Note that the relay coil (at terminals 85 and 86) is not polarity dependent.
- Ground out each relay at terminal 85 using the ground wire of each respective headlight wire pair.
- Connect switched +12V power from the headlight switch/LCM to terminal 86 of each relay.
- Mind the remaining terminals 30 (hot power from the battery) and 87 (switched power to the headlights), these will be wired up in a bit
- Grab a pair of 20A fuses and weather-resistant fuse holders to match (use whatever fuse type your interior and/or main fuse block is equipped with so there are fewer spares to keep on hand).
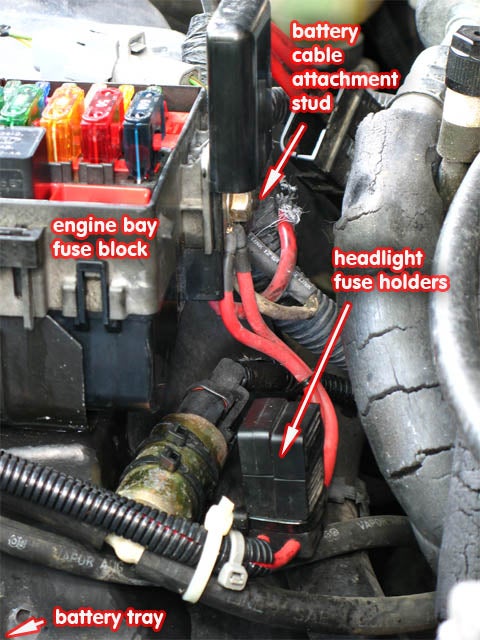
- Pop off the cover of the engine bay's main fuse block and note the large bolt on the engine side that serves as its power input from the battery. This bolt may have to be replaced with a slightly longer bolt due to the added thickness of the two (2) eyelet terminals needed for the relay power wires. Note that doing so will require fuse block disassembly. I chose to strive for full fault tolerance, so both headlight circuits can be replaced/serviced independently.
NOTE: optionally, the battery +12V post itself can be used as a power point...improvise at will. - With each fuse holder (don't put the fuse in...yet) in turn, choose a target relay and solder an eyelet terminal (sufficiently sized to fit the bolt of the fuse block) to one end and solder a length of 10 AWG wire (that will terminate at terminal 30 of the chosen relay) to the other end.
- Repeat for the other fuse holder and the other relay.
- Using all of the original headlight connectors, disassemble them completely using the correct disassembly tool (or a long pick may work--wear eye protection). The terminals inside are essentially Metri-Pak 280's. Acquire new terminals (and matching weather seals) correctly sized for the new wiring.
- For the headlights' +12V feed, correctly size four (4) lengths of 10 AWG wire to go from each relay to its matching circuit pair. One relay will serve two headlights (low- or high-beam). The resulting wiring will resemble a "Y" originating at a relay and terminating at each headlight (one on the driver's side and the other on the pass. side). FYI: the weather seals must be installed on the wires before the connector terminals.
- Solder the new headlight terminals on to one end of each wire, join the matching circuit wire pairs together, and solder to the respective relay harness (terminal 87).
- For the headlights' ground, correctly size ample lengths of 10 AWG wire to go from each headlight ground on one side of the vehicle to a central ground point in close proximity.
- Solder the new headlight terminals on to one end of each wire and solder an eyelet terminal to the other end. Bolt the eyelet terminals together to the vehicle.
- Reassemble all headlight connectors and plug them into to their respective headlight bulbs.
- Verify for correct wiring and use copious amounts of split loom and nylon zip ties to taste.
- Insert fuses into fuse holders.
- Reconnect battery.
- Test.
- Verify correct headlight aim and adjust if necessary.
Optional: replace headlight bulbs with new equivalents (filament luminous output does degrade with time).
----Article submission courtesy Dextrovic
#6
02-04-2010, 08:03 AM
Thanks for your help. Unfortunately, because we needed to be able to have the use of the car right away--we traded it off. The dealer we traded with was told of the problem. I hope they don't pass it on without fixing it. It could be very dangerous. Three mechanics had no idea of the problem. Thanks again. I wish I had time to wait on your responses. Lloyd
#7
02-09-2010, 08:28 AM
suvlights.com has a series cable that is supposed to be 'plug in play' to perform the headlight circuit upgrade. No wires to splice.
When my 2009 is out of warranty, I will do the upgrade since it seems the LCM is only good for a few years out fo warranty.
Sorry you traded your car off; this is an easy fix and would have saved you lots of money.
Take care, Bill
When my 2009 is out of warranty, I will do the upgrade since it seems the LCM is only good for a few years out fo warranty.
Sorry you traded your car off; this is an easy fix and would have saved you lots of money.
Take care, Bill
#8
04-12-2014, 10:52 AM

There is an extended warranty on the LCM for the headlights. The problem is the headlights go out without warning. Ford has extended the warranty to 15yrs/250,000. Must be done at Ford and the fix is free.
#9
11-09-2015, 11:33 AM

Please Help. I have watched and read everything I could find here but cannot find my configuration. I need to know what the proper pin hole in my circuit board are to receive the wires from my external relay. (30, 85, 86, 87, 87a) Is there anybody out there who can help? "1998 Crown Vic Police interceptor"

